LaTeX Notebook Functionality
This package contains tools for running a LaTeX notebook with embedded python code. One can then, for instance, keep an electronic lab notebook where the plots and data are generated and processed in place, immediately from the raw data. The figure below shows a typical debugging session. (The author of the project has kept an electronic notebook for several years in this way with great success.)
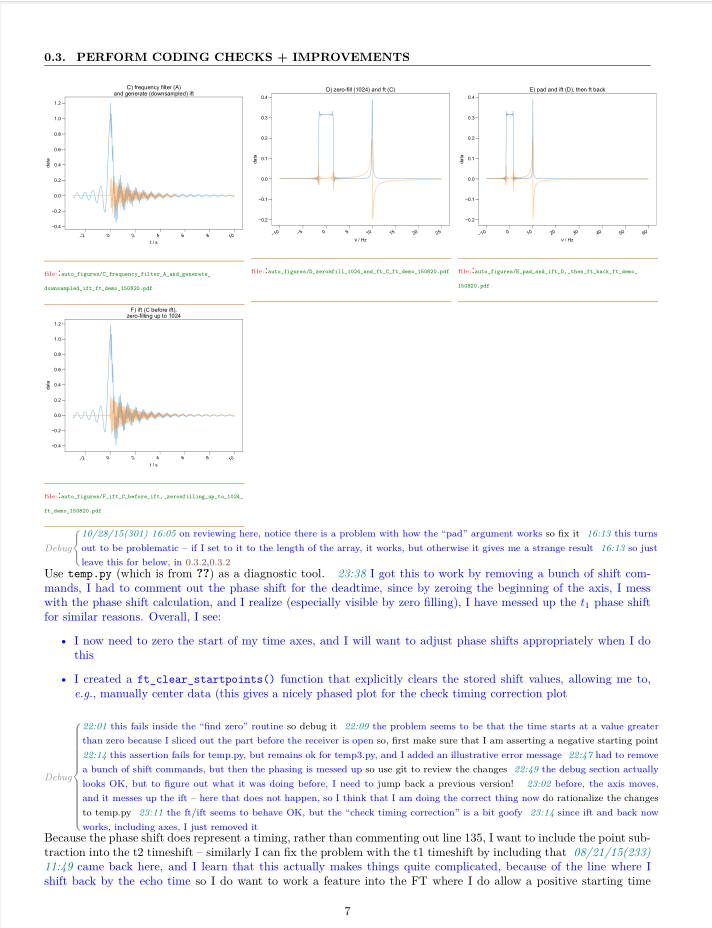
Example LaTeX notebook page, showing embedded figures
Please note that this is a very different “notebook” than the one supplied by jupyter notebooks (which pyspecdata also supports). In this section, we aim to provide a laboratory notebook with publication-ready figures and a complete path from raw data to those figures.
With minimal effort, it is possible to design a notebook that works in a similar fashion with HTML, Markdown, etc. (The main author just has no interest in doing this, since the PDF output looks very nice.)
It’s highly recommended to keep a notebook as a series of different files that have no preamble or ending (i.e. only the part that goes inside the
documentenvironment), which can then be collected into a gigantic master document with the\input{...}command, or compiled individually (e.g. while you are actually in the lab working on a particular section).It’s also highly recommended to store notes organized by project, which can then be cross-referenced in a separate chronological document (or vice versa) with the
\\ref{...}command.
Setting up the notebook
Install the Latex Packages
In order to be able to build a latex notebook where \begin{python}...\end{python} environments are replaced with the code output,
we first need some helper latex style files.
To make latex files accessible anywhere on your computer, you place them inside a “texmf” directory tree, and then register them with your latex compiler.
Note that, similar to a python package, there are strange requirements on the structure and directory names of a texmf directory tree. You can’t just rename the directories as you would like.
The pyspecdata repo itself now has a subdirectory called texmf that is a ready-to-go texmf tree for this purpose.
How do I register the texmf directory?
Under Windows, you can add the texmf tree graphically by opening “miktex console” from the start menu.
If the menu options are greyed out, you need to activate administrator mode.
Inside miktex, go to “settings” → “directories” and click the plus symbol → select the texmf directory inside your pyspecdata repository (
[DIRECTORY ONE UP FROM PYSPECDATA FOLDER]/pyspecdata/texmf) So that the “Folder” box says “texmf” → click select folder. If this works for you, you don’t need to do the next bulletIn general (windows or otherwise) you should be able to use the command
initexmf --register-root=[DIRECTORY ONE UP FROM PYSPECDATA FOLDER]/pyspecdata/texmf
Once you’ve done this, the shell command kpsewhich mypython.sty
should return a result
(if you have miktex installed on windows, this should work from either the git
bash prompt or the dos or powershell prompt).
Use the pySpecData latex wrapper
The pyspecdata package proves the commands pdflatex_notebook_wrapper and update_notebook_pythonscripts, described below under “Running the notebook.”
It also provies the command pdflatex_notebook_view_wrapper, which is used to determine the output PDF and call an appropriate viewer.
If pyspecdata is installed, and the texmf directory is registered with your latex compiler (e.g. miktex), you should be able to clone and compile the example notebooks repo from the franck lab
You can compile the tex file by typing:
pdflatex_notebook_wrapper -synctex=-1 notebook.tex
inside the root directory of the notebook_example repo.
To get the results of the code to appear, you need to run this command twice the first time.
It might take a few passes, but you should able to run this command without have latex complain about missing packages! * If this happens in miktex, you need to
go to miktex settings → general, and set it to automatically download new pages. Be sure to click “for all users”!
delete notebook.aux (rm notebook.aux) and the scripts directory, and run again
The first time you do this, miktex might need to install many packages, so that you need to keep hitting enter and then reattempting.
It’s assumed that your latex files are stored in a “notebook directory.” In some cases, during the first run, an explanatory error will appear – just follow the instructions.
Install a PDF viewer that plays nice with latex
On Windows, you will want to install Sumatrapdf (use the installer version, not the portable version) to view your PDFs, since it automatically updates when the PDF is recompiled.
On Linux, Zathura is very nice.
(Optional/Recommended) set up latexmk
Get set up with standard latex compilation system:
You can use latexmk (shipped with miktex) with Sumatrapdf
(Sumatrapdf allows you to edit the PDF while it’s open in Sumatrapdf, while Adobe Acrobat does not).
Here is a ~/.latexmkrc file that works on windows:
$pdflatex=q/pdflatex_notebook_wrapper %O -synctex=1 --xelatex %S/;
$pdf_previewer=q/pdflatex_notebook_view_wrapper/;#calls the wrapviewer function
It should also be possible to use TeXworks by adding pdflatex_notebook_wrapper to preferences → typesetting → processing tools.
Running the notebook
If you create figures with the figlist_var class,
you should simply be able to write a latex file with embedded
python environments (\\begin{python} … \\end{python})
replace the pdflatex command with
pdflatex_notebook_wrapper when compiling your latex notebook,
to drop the code and plots in place.
For clarity, the code output is a slightly different color (a
dark brown) than the standard text.
A synctex “jump to source” on the resulting portion of the PDF
will send you to the tex output, which is stored in
scripts/*.tex, where * is a sequential number
corresponding to the script, and the python source used to
generate it is stored in scripts/*.py.
Each snippet of unique code is run only once, ever making the
notebook fast and efficient.
For now, an important drawback to this is that if you change modules or
libraries called by the script, the resulting PDF output will not
change.
To get around this, a command is provided that forces scripts to
be re-run. You use it like this: update_notebook_pythonscripts
flush 10 21 – which will flush script numbers 10 to 21.
Manually deleting the .py files inside the scripts directory
will not have the same effect.
Todo
To limit downtime for the PDF, pdflatex_notebook_wrapper currently copies the final pdf to a truncated filename (assuming that the filename consists of words separated by underscores, it drops the last word).
It would be much better to copy the source PDF into a subdirectory, build it there, and then copy the pdf back into the main directory. This would entail changing the paths of the various files
\RequirePackage[log]{snapshot} might be helpful to log files here.
probably we will just want to add commands to renewcommand for input as well as the graphicx root.
How it works
Note that the code works a bit differently than in previous versions – while it previously required LaTeX to be run with shell-escape enabled,
pdflatex_notebook_wrapperdoesn’t require this.pdflatex_notebook_wrapperjust callspdflatexfollowed byupdate_notebook_pythonscriptsTo compile, use
pdflatex_notebook_wrapper --xelatex
The file mypython.sty looks for the python environment, it pulls the relevant
code, outputs it to scripts/*.py and then writes a command to
the .aux file that tells LaTeX where to find the
scripts/*.tex output.
The scripts/*.tex output is only updated once
update_notebook_pythonscripts (without arguments) is run.
update_notebook_pythonscripts runs through the various
scripts/*.py files, checks and checks whether or not they
have been previously cached (under the same or a different script
number). If the python code is in the cache, it just pulls the
cached output. If not, it runs the file, and stores the result
in the cache.